
The music’s on and you’re sipping your opening cocktail at home in preparation for a night out with your girls or with Bae. Hair done? Check. Makeup done? Check. Fly heels? Check and check. You grab your keys only to realize your nails look A. Hot. Mess.
What do you do now?
If your nails are chipped, there’s an easy solution: just remove the polish. Naked nails are way better than chipped polish. (Here’s a hint: D.I.D. Nail Paint Remover takes color off in a few swipes, leaving behind zero smell.)
On the other hand, if you're the type that loves a complete look from head to toe, then you’ll need a plan of attack. Follow these simple steps to get your nails D.I.D. plus make it out the door sans the gooey mess—in 10 minutes or less.
Step 1: Layer Up, Darlin’
Put your jacket on and pack your purse. If it’s cold outside, put your jacket or coat on now to avoid messing up your mani when you put your arms through your sleeves. Making sure you have your wallet, lipstick, gum and anything else you need in your bag so you don’t have to stick your hand in your bag while your nails are wet. Grab or dig for anything you might need, like your keys or transit card and lay them in a position that makes them easy to pick up.
Step 2: Send Out A Bat Signal
Grab your phone, but no selfie-taking, yet! You’ll want to send any last minute text messages, or open a car service app to request your ride while your nails dry if you’re not driving or taking public transportation. Sending an “I’m 5 minutes away” text will not be the ruin of your manicure on our watch!
Step 3: Gather Your Mani Materials
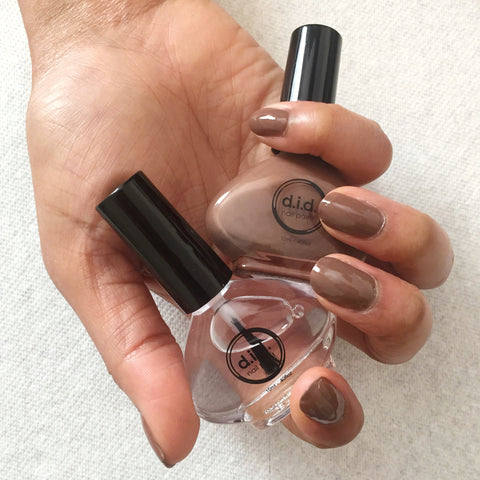
You’ll need a paper towel, a neutral nail shade like Birthday Suit, Skinny Dip, Clean Slate or Voyeur. Mess-ups are less noticeable with softer shades. And last, you’ll need a quick dry top coat like Finish.
Step 4: Paint, Paint, Paint!
It’s time to paint. It’s best to lay down your polish in three strokes. Starting with your pinky nail, apply your nail color with the first stroke down the middle of your nail bed. Then, apply the second stroke to the right side of your nail. Last, apply the third and last stroke of polish to the left side of your nail. Repeat these steps until you’ve got 10 perfectly painted nails. As tempted as you might be, don’t rush this part.
Step 5: Apply Quick Dry Top Coat
Apply a quick-drying top coat using the three polish strokes method. It’ll give your nails an amazingly glossy finish, plus speed your dry time. But, remember: treat everything like it’s poison until your nails are completely dry.
That’s it! Consider your nails officially D.I.D. Take a few selfies and walk out the door like you own it—because you do.
Hi Colleen! You’re welcome, stay tuned for more tutorials and beauty stories on The Nail Files! Don’t forget to show off your DIY D.I.D. Nail Paint manicure :-)
Hello, recently I ordered the start/finish polishes and some others because I really enjoy doing my own nails sometimes. Now I’ve learned how to polish my right in three simple strokes and add polish on the gogo 😊. Thanks for helping me with me.
Leave a comment